6. Quickstart
This quickstart will teach you how to create, release and install:
a MFBASE PostgreSQL storage plugin, i.e create a :index:`PostgreSQL` database (with :index:`PostGIS` extension available).
a MFBASE WebDAV storage plugin, i.e manage a :index:`WebDAV` repository (through :index:`Nginx`).
6.1. Prerequisites
The MFBASE module must be installed. See installation instructions.
Once mfbase is installed:
The command
ls /opt |grep mfbasemust return something.A
mfbaseuser and, therefore, a/home/mfbasedirectory are created.
Hint
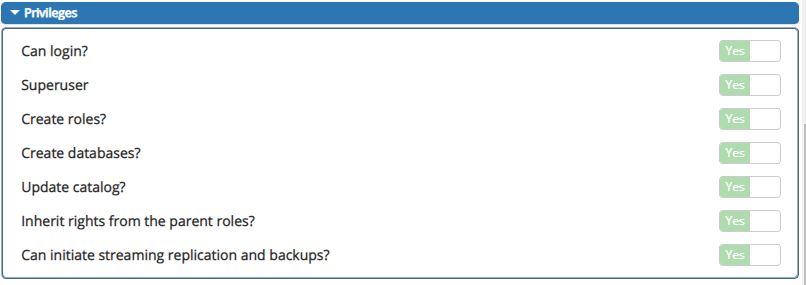
Once MFBASE is installed, a metwork PostgreSQL administrative account is created with default password metwork. You can change it in the [postgresql] section of the /home/mfbase/config/config.ini file. The created database user has the following privileges:

6.2. Activate MFBASE environment by logging in as mfbase user.
Once MFDATA is installed, a mfdata user and, therefore, a /home/mfbase directory are created.
Log in as the mfbase user:
su - mfbase
Note
If it’s the first time you log in as mfbase user, there is no default password. You have to either set a password before (passwd mfbase or sudo passwd mfbase) or use su - mfbase from root to log in as mfbase user.
When you are logged in as mfbase user, you must see a MetWork welcome screen on your terminal like:
           __  __      ___          __        _
          |  \/  |    |        / /       | |
          |  / | ___| | / / /__  _ __| | __
          | |\/| |/ _ __\ \/  \/ / _ \| '__| |/ /
          | |  | |  __/ |_  / / (_) | |  |   <
          |_|  |_|\___|\__| \/  \/ \___/|_|  |_|\_\

Welcome on xxxx (xxxxx.meteo.fr, 192.168.1.170)
(module: MFBASE, version: integration.14.3d17536)

 14:28:51 up 18 days,  2:49,  1 user,  load average: 0.16, 0.21, 0.23
Then you are able to create your first plugin.
6.3. Creating your first plugin with PostgreSQL Database support
We are going to create a foo plugin, and then create the corresponding database named plugin_foo.
6.3.1. Create the PostgreSQL plugin
First, list the available templates, the following command:
bootstrap_plugin.py list
Currently, there is only one default template :
List of available plugin templates:
     * default
To create the plugin, run the following command:
bootstrap_plugin.py create foo
Once you have entered this command, you will be asked to fill in some fields to configure and customize your plugin: for now, press [ENTER] to set the most of the default value, except for Select use_storage:, you may enter 2 (no), because we don’t need WebDAV support here.
You will be able to modify your plugin configuration anytime later.
The /home/mfbase directory now contains a foo sub-directory with files:
config.ini : configuration file of the plugin
Makefile : directives to build the plugin
crontabcrontabfile to schedule the execution of programs, empty by default. For further details, refer to The crontab support section
sql/foo.sql : SQL queries to run during plugin installation (empty for the moment)
Let’assume we want to create an account table on installation. To do this, edit the sql/foo.sql script and add you slq instruction to create the table:
-- SQL queries to run during plugin installation
CREATE TABLE account(
     user_id serial PRIMARY KEY,
     username VARCHAR (50) UNIQUE NOT NULL,
     password VARCHAR (50) NOT NULL,
     email VARCHAR (355) UNIQUE NOT NULL,
     created_on TIMESTAMP NOT NULL,
     last_login TIMESTAMP
);
Right now, the database is not yet created. You have to release your plugin then install your plugin in order to create you database.
6.3.2. Releasing the PostgreSQL plugin
We will now release the foo plugin. Releasing a the plugin makes it ready to be deployed/installed.
To do this, go to the foo plugin directory and enter the command:
make release
This will create a .plugin file that will be used to deploy/install the plugin, e.g. foo-[version]-1.metwork.mfbase.plugin where [version] is the value of the version parameter of the foo config.ini you enter when you create the plugin (default value is ${MFMODULE_VERSION}). You may change it:
# Version of the plugin (X.Y.Z)
# If the value is [MFMODULE_VERSION],
# the current module version is used
version=1.0.0
Hint
6.3.3. Installing the PostgreSQL plugin
By installing the plugin, we will create the database on PostgreSQL database server of the current machine, i.e. the machine from which we run the plugin installation.
In order to install the database, enter the command plugins.install {path_toyour.plugin_file}, e.g.:
plugins.install foo-1.0.0-1.metwork.mfbase.plugin
This will create:
a
plugin_foopostgresql databasea
plugin_foopostgresql username (with full rights onplugin_foodatabase)a default password:
plugin_fooforplugin_foousername
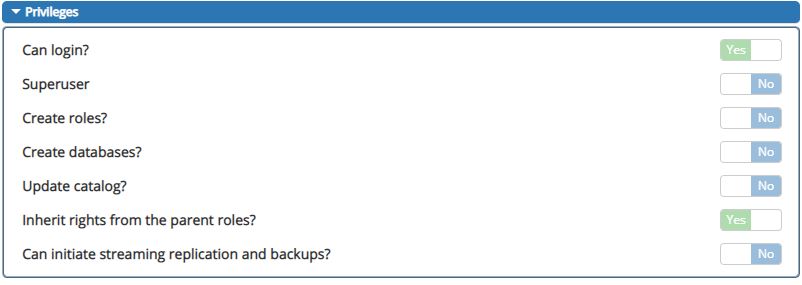
The created database user has the following privileges:

Note
The database name consists of the following : plugin_{your_plugin_name}. Same for the database username/userpassord.
Important
If the plugin is already installed, you have to uninstall the PostgreSQL plugin.
Then, check the foo plugin is installed, enter:
plugins.list
Output:

| NAME                      | VERSION                   | RELEASE
---------------------------------------------------------------------------
| foo                       | 1.0.0                     | 1
6.3.4. Testing your database
As the default port for the mfbase postgresql server is 7432, you can connect
to your newly created database with this command:
psql -U plugin_foo -h localhost -p 7432 plugin_foo
# (use plugin_foo as password when prompted)
or by configuring your favorite postgresql client to:
Output:

hostname: your_mfbase_host
username: plugin_foo
password: plugin_foo
port: 7432
database: plugin_foo
Then check the account table is created. Connect to PostgreSQL server, the database plugin_foo. Then, issue the command \d account to find the information on columns of the account table:
Password for user plugin_foo:
psql (10.1)
Type "help" for help.

plugin_foo=> \d account
Output:

                                           Table "public.account"
   Column   |            Type             | Collation | Nullable |                 Default
------------+-----------------------------+-----------+----------+------------------------------------------
 user_id    | integer                     |           | not null | nextval('account_user_id_seq'::regclass)
 username   | character varying(50)       |           | not null |
 password   | character varying(50)       |           | not null |
 email      | character varying(355)      |           | not null |
 created_on | timestamp without time zone |           | not null |
 last_login | timestamp without time zone |           |          |
Indexes:
    "account_pkey" PRIMARY KEY, btree (user_id)
    "account_email_key" UNIQUE CONSTRAINT, btree (email)
    "account_username_key" UNIQUE CONSTRAINT, btree (username)
6.3.5. Uninstalling the PostgreSQL plugin
You may want to uninstall the plugin, for instance, in order to install it again or install a newer version of the plugin.
Caution
Uninstalling a MFBASE plugin causes the deletion of the database without any confiramtion. So, before uninstalling the plugin, maybe you should do a backup of the database, to avoid losing your database data.
In order to uninstall (destroy) the database, enter the command plugins.uninstall {your_plugin_name}, e.g.:
plugins.uninstall foo
6.4. Creating your first plugin with WebDAV support
We are going to create a foo_webdav plugin.
6.4.1. Create the WebDAV plugin
First, list the available templates, the following command:
bootstrap_plugin.py list
Currently, there is only one default template :
List of available plugin templates:
     * default
To create the plugin, run the following command:
bootstrap_plugin.py create foo_webdav
Once you have entered this command, you will be asked to fill in some fields to configure and customize your plugin: for now, press [ENTER] to set the most of the default value, except for Select use_postgresql:, you may enter 2 (no), because we don’t need PostgreSQL support here.
You will be able to modify your plugin configuration anytime later.
The /home/mfbase directory now contains a foo_webdav sub-directory with files:
config.ini : configuration file of the plugin
Makefile : directives to build the plugin
crontabcrontabfile to schedule the execution of programs, empty by default. For further details, refer to The crontab support section
initial_storage/foo.txt : just a sample file available through http storage.
Let’s now install (as dev build) the plugin by entering the command (from the foo_webdav plugin directory):
make develop
Then, check the foo_webdav plugin is installed, enter:
plugins.list
Output:

| NAME                      | VERSION                   | RELEASE
---------------------------------------------------------------------------
| foo_webdav                | dev_link                  | dev_link
6.4.2. Testing the WebDAV plugin
First, we will do a GET request, with cUrl, on the storage service for the foo_text file created in the initial_storage.
The url to request is : http://<your_hostname_or_ip>:<mfbase_nginx_port>/storage/<your_plugin_name>/<your_file>, e.g.:
curl http://localhost:18942/storage/foo_webdav/foo.txt
The response is the content of the foo.txt file:
Output:

just a file available through http storage
Note
The requested file is not the file stored in the initial_storage directory. When you run make develop or when you install the plugin with the plugins.install […].plugin (.plugin file built with make release), the content of the initial_storage is copying into the ./var/storage/foo_webdav MFBASE home directory.
Be careful when you run the make develop command or when you (re)install the plugin because the ./var/storage/foo_webdav will be erased and replaced by the content of the initial_storage directory.
Important
Now, we will upload a new file (binary file) to our WebDAV repository with a PUT request.
The url to request is : http://<your_hostname_or_ip>:<mfbase_nginx_port>/storage/<your_plugin_name>/[<subdir>]/<your_file>, e.g.:
curl -XPUT --data-binary @/tmp/test.grib2 http://localhost:18942/storage/foo_webdav/grib/grib4D/test_grib.grib2
Important
By default, the maximum size (in MB) for one storage item is 100 Mo If you need too upload larger files, change the Nginx configuration upload_max_body_size parameter value if the MFBASE configuration file.
Tip
You can check, from your browser, the directory listing of your uploaded files with the following url:
http://<your_hostname_or_ip>:<mfbase_nginx_port>/storage/<your_plugin_name/[<subdir>]/, e.g. http://localhost:18942/storage/foo_webdav/grib/grib4D/
This is made possible thanks to the Nginx configuration storage_autoindex parameter set to 1.
If you want to disable this behaviour, set storage_autoindex=0 in the MFBASE configuration file (and restart MFBASE service).
You can also check the uploaded file is the same as the roginal one. Download the uploaded file above and compare the original file and the downloaded one. There is no difference, e.g.:
curl -o /tmp/test_grib_downloaded.grib2 http://localhost:18942/storage/foo_webdav/grib/grib4D/test_grib.grib2
diff /tmp/test_grib_downloaded.grib2 /tmp/test.grib2
Let’s now delete recursively uploaded directory (e.g. grib), e.g.:
curl -XDELETE http://localhost:18942/storage/foo_webdav/grib/
Warning
At this time, even if each plugin is namespaced, there is no security between plugins (you can delete the files of another plugin) and there is no security from the outside world (you can do DELETE request from anywhere).
However, you can restrict globally, in Nginx configuration, the allowed DAV methods (storage_dav_methods), the min. delete depth (storage_min_delete_depth), the autoindex feature (storage_autoindex). You can also disable Nginx if you don’t need it (flag=0).