Quick Start
1. Activate the MFDATA environment
One of the first thing, you have to do is to load the "MFDATA environment" in your shell session. There are several ways to do that: check :doc:the related documentation <../mfdata_load_env>.
In this tutorial, follow :ref:this way <activate_mfdata_user>, i.e. log in as the mfdata user.
2. Create your first plugin
This step will teach you how to create, run, release and deploy a simple MFDATA plugin with a MFDATA template.
We are going to make a move plugin, we will called move_image. This plugin will simply moves incoming JPEG image files to a set destination folder, and ignore all other file types.
If it's the first time you log in as mfdata, you have to set a password before (passwd mfdata or sudo passwd mfdata).
To make our move_image plugin work, we need the switch plugin, this plugin is installed by default with MFDATA. It guides incoming data files towards the appropriate plugin depending on switch conditions defined by each plugins.
2.1 Create the plugin
First, list the available templates, the following command:
bootstrap_plugin.py list
will show you :
List of available plugin templates:
     * archive
     * default
     * delete
     * fork
     * ftpsend
     * move
Use the move template to create the plugin : run the following command:
bootstrap_plugin.py create --template=move move_image
Once you have entered this command, you will be asked to fill in some fields to configure and customize your plugin: for now, press [ENTER] to set the default value, you will be able to modify your plugin configuration anytime later.
The /home/mfdata directory now contains a move_image sub-directory with files:
config.ini : configuration file of the plugin
main.py : python entry point of the plugin
Makefile : directives to build the plugin
Set the destination directory dest-dir parameter: edit the move_image/config.ini file, and set the arg_dest-dir parameter (of the step_main section) with your destination directory (e.g. /tmp/my-jpeg-file)
# dest-dir : target directory to move to
arg_dest-dir = /tmp/my-jpeg-file
You will notice the syntax to set argument in the config.ini file: arg_[my-arg] with [my-arg] the argument name, e.g. arg_dest-dir means --dest-dir argument.
We will now set the condition that allow to move only JPEG files in a destination directory.
To do this, set the switch_logical_condition parameter in the move_image/config.ini : it represents the condition that must be respected so the switch directs the data to your plugin. In other words, it represents what kind of data will be orientated towards your plugin by the switch plugin:
switch_logical_condition = ( x['latest.switch.main.system_magic'].startswith(b'JPEG image') )
latest.switch.main.system_magic is a tag attribute of the file processed by the switch plugin.
The switch_logical_condition condition have to be written as Python syntax. This condition must be a boolean expression that evaluates as True for the type of data you are interested in.
.. tip:: Every time you change the plugin configuration, this configuration will be always automatically reloaded.
Let's now install (as dev build) the plugin by entering the command (from the move_image plugin directory):
make develop
Check the plugin is installed:
plugins.list
You should show the plugin is installed as dev build, i.e. dev_link
| NAME                      | VERSION                   | RELEASE
---------------------------------------------------------------------------
| switch                    | master.ci77.f0d7991       | 1
| move_image                | dev_link                  | dev_link
2.2 Run the plugin
Let's now run the plugin by injecting a JPEG file in the incomming directory of the switch plugin. Enter the command below to inject the file into the configured directory listened by the switch plugin
inject_file --incoming [my_jpeg_file]
Note: by default :
-
the root data directory of MFDATA is
/home/mfdata/var/in(MFDATA_DATA_IN_DIR environment variable) -
the directory listened by the switch plugin is
${MFDATA_DATA_IN_DIR}/incoming, whereincomingis configured in the${HOME}/config/config.inifile (where${HOME}is the home directory of themfdatauser):# directories listened by the switch plugin # (separated by ";") # switch_directories=incoming
Another way to inject the JPEG file is to copy it in the ${MFDATA_DATA_IN_DIR}/incoming
cp [my_jpeg_file] /home/mfdata/var/in/incoming/
Then check the JPEG file has been copied in the destination directory (i.e /tmp/my-jpeg-file).
You can also check the log files of the switch plugin and the move_image plugin. log files are stored in the ${HOME}/log directory :
- step_switch_main.stdout:
2019-03-07T07:19:52.831304Z [INFO] (mfdata.switch.main#14459) Start the processing of /home/mfdata/var/in/incoming/penguins.jpg...
2019-03-07T07:19:52.838518Z [INFO] (mfdata.switch.main#14459) 1 selected directories (0 by hardlinking)
2019-03-07T07:19:52.839523Z [INFO] (mfdata.switch.main#14459) File /home/mfdata/var/in/tmp/switch.main/2fb4d3b152cb4a57834ff0e328cf4197 moved to /home/mfdata/var/in/step.move_image.main/df7e8956cdb94fd3a835e301be332166
2019-03-07T07:19:52.839718Z [INFO] (mfdata.switch.main#14459) End of the /home/mfdata/var/in/incoming/penguins.jpg processing after 5 ms
- step_switch_main.stderr : empty
- step_move_image_main.stdout:
2019-03-07T07:19:53.471712Z [INFO] (mfdata.move_image.main#14491) Start the processing of /home/mfdata/var/in/step.move_image.main/df7e8956cdb94fd3a835e301be332166... \ 2019-03-07T07:19:53.477857Z [INFO] (mfdata.move_image.main#14491) /home/mfdata/var/in/tmp/move_image.main/82d41b17a8af4081be010f2bcbae61b7 copied into /tmp/my_jpeg_file/penguins.jpg \ 2019-03-07T07:19:53.478069Z [INFO] (mfdata.move_image.main#14491) End of the /home/mfdata/var/in/step.move_image.main/df7e8956cdb94fd3a835e301be332166 processing after 3 ms \
- step_move_image_main.stderr : empty
The diagram below shows the data flow:
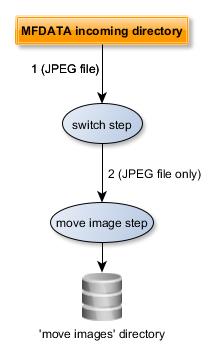
- The JPEG file is processed by
switchfrom the MFDATA incoming directory - The
move_imageplugin process the JPEG file (theswitch_logical_conditionisTrue)
Let's now inject a file which is not a JPEG one use inject_file command or cp command).
- Check the
step_switch_main.stdoutlog file:
2019-03-07T08:40:43.142957Z [INFO] (mfdata.switch.main#23646) Start the processing of /home/mfdata/var/in/incoming/test.txt... \ 2019-03-07T08:40:43.148140Z [INFO] (mfdata.switch.main#23646) 0 selected directories (0 by hardlinking) \ 2019-03-07T08:40:43.148236Z [INFO] (mfdata.switch.main#23646) No condition matched for /home/mfdata/var/in/tmp/switch.main/c0a645867f5b494b8d30d7d76b4eba58 \ 2019-03-07T08:40:43.151121Z [INFO] (mfdata.switch.main#23646) End of the /home/mfdata/var/in/incoming/test.txt processing after 5 ms \
- The injected file doesn\'t match any switch condition, it is deleted (the default "no match" policy).
Note : you may change the "no match" policy, by changing the switch_no_match_policy parameter of the ${HOME}/config/config.ini file:
# "no match" policy for the switch plugin:
# delete => we delete the file
# keep => we keep the file in trash
# move => we move the file in another directory (see below)
switch_no_match_policy=delete
If you set the move "no match" policy, you have to set the switch_no_match_move_policy_dest_dir parameter to the directory you want the switch plugin move the 'no match" file:
    # if switch_no_match_policy = move, set the destination directory
    switch_no_match_move_policy_dest_dir=/tmp/nomatch
IMPORTANT: every time you change the MFDATA configuration file (${HOME}/config/config.ini), you have to stop and start MFDATA to reload the configuration, by entering the commands :
- either
mfdata.stop mfdata.start - or (as root user)
service metwork restart mfdata
2.3 Release the plugin
We will now release the move_image plugin (considering it as a stable version). Releasing a plugin makes it production-ready, ready to be deployed.
To do this, go to the move_image plugin directory and enter the command:
make release
This will create a .plugin file that will be used to deploy the plugin, e.g. move_image-[version]-1.metwork.mfdata.plugin where [version] is the value of the version parameter of the move_image config.ini you enter when you create the plugin (default value is ${MFMODULE_VERSION}). You may change it:
# Version of the plugin (X.Y.Z)
# If the value is [MFMODULE_VERSION],
# the current module version is used
version=1.0.0
2.4 Deploy the plugin
Let's now deploy the move_image plugin on a production environment.
Prerequisites:
- Metwork have to be installed on this environment (at least MFDATA and its dependencies MFEXT).
- You be logged in as mfdata user
In order to deploy the plugin on a production environment, put down the move_image-[version]-1.metwork.mfdata.plugin in a directory on this target environment, e.g. /home/mfdata/released_plugins
Note: for this tutorial, if your production environment is the same as your development environment, you have to uninstall the move_image plugin which is already installed (by the make develop command). To uninstall the plugin, enter:
plugins.uninstall move_image
Then, check the move_image plugin is no longer installed, enter:
plugins.list
You should not show the move_image plugin
| NAME                      | VERSION                   | RELEASE
---------------------------------------------------------------------------
| switch                    | master.ci77.f0d7991       | 1
Let's now install the plugin on the production environment, enter:
plugins.install /home/mfdata/released_plugins/move_image-1.0.0-1.metwork.mfdata.plugin
Then, check the move_image plugin is installed, enter:
plugins.list
| NAME                      | VERSION                   | RELEASE
---------------------------------------------------------------------------
| switch                    | master.ci110.2ccccb3      | 1
| move_image                | 1.0.0                     | 1
In practice, the plugins are installed in the ${HOME}/var/plugins directory.
.. tip::
Another way to install the MFDATA move_image plugin in a production environment is to put down the .plugin file into /etc/metwork.config.d/mfdata/external_plugins directory. Then to install the plugin, you just restart the MFDATA service by entering service metwork restart mfdata command (as root user).
Check :doc:../mfdata_deploy_plugin.
.. index:: ungzip plugin
3. Use of the ungzip plugin
The ungzip plugin allows you to unzip .gz files. This plugin automatically handles .gz files and returns the unzipped file to the switch.
The ungzip is NOT installed by default.
First, let's create an archive_image plugin from the MFDATA template archive. This template allows you to archive data, i.e. moving a file to an associated archiving directory.
Enter the command:
bootstrap_plugin.py create --template=archive archive_image
Configure the switch_logical_condition parameter in the archive_image/config.ini that allow to archive only PNG files.
switch_logical_condition = ( x['latest.switch.main.system_magic'].startswith(b'PNG image') )
Configure the archive directory arg_dest-dir parameter in the archive_image/config.ini set the arg_dest-dir parameter :
arg_dest-dir = /tmp/my_archive_image
Install (as dev build) the plugin by entering the command from the archive_image plugin directory:
make develop
Check the plugin is installed, by running plugins.list
Run the plugin: inject a PNG file :
inject_file --incoming /tmp/my_png_file.png
Check the PNG file is 'archived'. Go to the /tmp/my_archive_image/[YYYYMMDD] directory where [YYYYMMDD] is the current date: you will see your PNG file is archived with a 'RANDOM_ID' name: e.g. 2b199aac9ce2489b9f81f5a274ce7bf0
Notice, you may change the archive file name, by changing the defaut value of the arg_strftime-template in the archive_image/config.ini, e.g.:
# strftime-template : template inside above archive directory (strftime
#    placeholders are allowed, / are allowed to define subdirectories,
#    {ORIGINAL_BASENAME}, {ORIGINAL_UID}, {ORIGINAL_DIRNAME}, {RANDOM_ID},
#    {STEP_COUNTER} and {STEP_COUNTER_MINUS_1} are also available
#    Default is : "%Y%m%d/{RANDOM_ID}"
arg_strftime-template = %Y%m%d/{ORIGINAL_BASENAME}_{RANDOM_ID}
Now we would also like to archive the compressed PNG images.
Let's now inject a compressed PNG file (.gz).
Compress your PNG file (my_png_file.png.gz) and inject it:
inject_file --incoming /tmp/my_png_file.png.gz
If the ungzip plugin is not installed, you will see the image is not archived in the /tmp/my_archive_image directory, because it's not a PNG file but a GZIP file.
Let's now Install the ungzip plugin (if not already installed).
In order to install this plugin, you just have to set install_ungzip=1 in the [internal_plugins] section of the MFDATA configuration file (/home/mfdata/config/config.ini).
Then restart MFDATA service by entering service metwork restart mfdata command (as root user).
Then, check the ugzip plugin is installed, enter:
plugins.list
You should show the ungzip plugin is installed
| NAME                      | VERSION                   | RELEASE
---------------------------------------------------------------------------
| switch                    | master.ci77.f0d7991       | 1
| ungzip                    | master.ci53.508288c       | 1
| archive_image             | 1.0.0                     | 1
Now, inject again the compressed PNG file.
You will see the PNG file is now archived in the /tmp/my_archive_image, according to the arg_strftime-template parameter, as an uncompressed PNG file.
The diagram below shows the data flow:
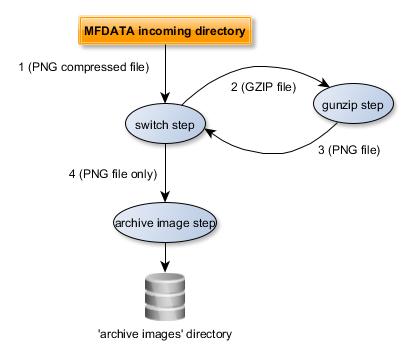
- The GZIP file is processed by the
switchplugin from the MFDATAincomingdirectory - The
gunzipplugin uncompress the file - The
gunzipplugin puts the PNG file in theincomingdirectory. It will be process by theswitchplugin - The
archive_imageplugin processes the PNG file (theswitch_logical_conditionisTrue)
Note : the archive template allows to keep tags/attributes, about the data flow, into another file. The .tags file is stored in the same directory as the archived file directory (same filename with extension .tag):
0.switch.main.enter_step = 2019-03-12T06:39:49:234958
0.switch.main.exit_step = 2019-03-12T06:39:49:238562
0.switch.main.process_status = ok
0.switch.main.system_magic = gzip compressed data, was "temp.png", from Unix, last modified: Mon Mar 11 14:21:31 2019
1.ungzip.main.enter_step = 2019-03-12T06:39:49:244102
1.ungzip.main.exit_step = 2019-03-12T06:39:49:244923
1.ungzip.main.process_status = ok
2.switch.main.enter_step = 2019-03-12T06:39:49:250833
2.switch.main.exit_step = 2019-03-12T06:39:49:251946
2.switch.main.process_status = ok
2.switch.main.system_magic = PNG image data, 120 x 165, 8-bit/color RGBA, non-interlaced
3.archive_image.main.enter_step = 2019-03-12T06:39:49:258391
first.core.original_basename = temp.png.gz
first.core.original_dirname = incoming
first.core.original_uid = e93932b0e2424e9d988a54c833266be5
latest.core.step_counter = 3
latest.switch.main.system_magic = PNG image data, 120 x 165, 8-bit/color RGBA, non-interlaced