Additional Tutorials
1. A PNG to JPEG conversion plugin
Let's create an plugin to convert a PNG image to a JPEG image and then to archive the JPEG image.
First, we have to modify the archive_image plugin (see :ref:mfdata_quick_start:Use of the ungzip plugin tutorial) to be able to archive all images and not only PNG images.
Open the config.ini file of the archive_image plugin and change the switch_logical_condition to accept all images:
switch_logical_condition = ( b'image' in x['latest.switch.main.system_magic'] )
Now, create the converter plugin from the MFDATA fork template which allows to execute shell commands in a subprocess. Enter the command:
bootstrap_plugin.py create --template=fork convert_png
Configure the switch_logical_condition parameter in the convert_png/config.ini that allow to convert PNG files.
switch_logical_condition = ( x['latest.switch.main.system_magic'].startswith(b'PNG image') )
Then, let's create a script file (convert.sh in the convert_png plugin directory) to convert a PNG file to a JPEG file (we will use the ImageMagick convert tool):
#!/bin/bash
# $1 is the incoming PNG file.

# Convert to JPEG
convert "$1" "$1.jpeg"
# Re-inject the converted file to the switch plugin
inject_file --plugin=switch "$1.jpeg"
Set convert.sh as an executable file:
chmod +x convert.sh
Now, we have to say to the convert_png plugin to launch the convert.sh script for each file. To do this, configure the arg_command-template parameter in the convert_png/config.ini:
arg_command-template = {PLUGIN_DIR}/convert.sh {PATH}
.. caution::
The arg_command-template command must NOT be enclosed by quotation marks:
INVALID:
arg_command-template = "{PLUGIN_DIR}/convert.sh {PATH}"
arg_command-template = '{PLUGIN_DIR}/convert.sh {PATH}'

VALID
arg_command-template = {PLUGIN_DIR}/convert.sh {PATH}
Then, install (as dev build) the plugin by entering the command make develop from the convert_png plugin directory.
Check the plugin is installed, by running plugins.list.
Run the plugin: inject a PNG compressed file :
inject_file --incoming /tmp/my_png_file.png.gz
Check the archive directory. Go to the /tmp/my_archive_image/[YYYYMMDD] directory where [YYYYMMDD] is the current date.You will see two files, a PNG one and a JPEG one, with a 'RANDOM_ID' name: e.g. 85c87fe07e604c01bb81ba8311611466 and c210be74b8644aeeb6c1d41e4883649d:
file 85c87fe07e604c01bb81ba8311611466
85c87fe07e604c01bb81ba8311611466: PNG image data, 120 x 165, 8-bit/color RGBA, non-interlaced
file c210be74b8644aeeb6c1d41e4883649d
c210be74b8644aeeb6c1d41e4883649d: JPEG image data, JFIF standard 1.01
The diagram below shows the data flow:
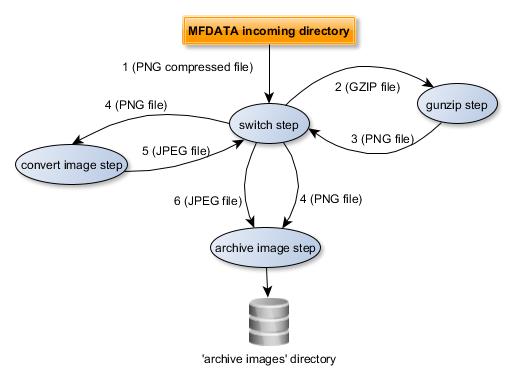
- The GZIP file is processed by the
switchplugin from the MFDATAincomingdirectory - The
gunzipplugin uncompress the file - The
gunzipplugin puts the PNG file in theincomingdirectory. It will be processed by theswitchplugin - The
archive_imageplugin processes the PNG file (itsswitch_logical_conditionisTrue). Theconvert_imageplugin processes the PNG file (itsswitch_logical_conditionisTrue). - The
convert_imageplugin puts (injects) the JPEG file in theincomingdirectory throw theswitchplugin (inject_file --plugin=switch "$1.jpeg"command in theconvert.shscript). It will be processed by theswitchplugin. - The
archive_imageplugin processes the JPEG file (itsswitch_logical_conditionisTrue).
.. index:: FTP
2. Sending a file by FTP
Let's now create an plugin from the ftpsend MFDATA template.
This new plugin aims to send a JPEG file to a FTP host.
Use the ftpsend template to create the plugin : run the following command:
bootstrap_plugin.py create --template=ftpsend ftpsend_to_mybox
Enter the machine, user and passwd when prompting, respectively the destination host, user and password (press [Enter] for the other parameters to keep the default value).
Go to the ftpsend_to_mybox sub-directory, open the config.ini file and check, in the [step_send] section, the parameters you have just entered:
# machine : target machine for ftp transfer
arg_machine = mybox
# user : target user for ftp transfer
arg_user = myuser
# passwd : target passwd for ftp transfer
arg_passwd = mypassword
Then, install (as dev build) the plugin by entering the command make develop from the ftpsend_to_mybox plugin directory.
Check the plugin is installed, by running plugins.list.
Let's now change the convert_png plugin to feed the new ftpsend_to_mybox plugin.
Open the convert_png/convert.sh script file and change the inject_file command as below in the convert_png plugin directory) to convert a PNG file to a JPEG file (we will use the ImageMagick convert tool):
#!/bin/bash
# $1 is the incoming PNG file.

# Convert to JPEG
convert "$1" "$1.jpeg"
# Re-inject the converted file to the switch plugin
inject_file --plugin=ftpsend_to_mybox --step=send "$1.jpeg"
.. tip::
The ftpsend template contains two steps (sendand reinject). It has no main (default) step. That's why we specify the step to execute in the inject_file command.
The diagram below shows the data flow:
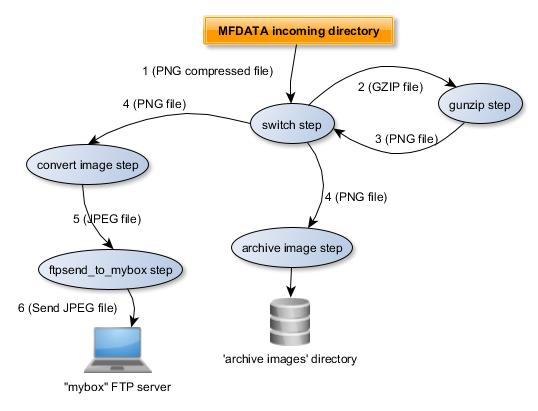
- The GZIP file is processed by the
switchplugin from the MFDATAincomingdirectory - The
gunzipplugin uncompress the file - The
gunzipplugin puts the PNG file in theincomingdirectory. It will be processed by theswitchplugin - The
archive_imageplugin processes the PNG file (itsswitch_logical_conditionisTrue). Theconvert_imageplugin processes the PNG file (itsswitch_logical_conditionisTrue). - The
convert_imageplugin puts (injects) the JPEG file to theftpsend_to_myboxplugin (inject_file --plugin=ftpsend_to_mybox --step=send "$1.jpeg""command in theconvert.shscript). It will be processed by theftpsend_to_myboxplugin. - The
ftpsend_to_myboxplugin sends the JPEG file to "mybox".
3. Create a plugin from scratch
This tutorial is designed to help you get started with MFDATA plugin from scratch, i.e. without any MFDATA template.
Let's suppose we want to create a plugin to convert a GRIB file into a NetCDF file.
In this tutorial:
- we will use:
- the
grib_to_netcdfcommand from eccodes (see https://confluence.ecmwf.int/display/ECC) and available in the Metwork MFEXT 'scientific' package - the
NetCDF4Python library (see http://unidata.github.io/netcdf4-python/)
- the
- we will call
grib_to_netcdfcommand from Python code (instead of a shell script). - we will save the NetCDF file in a specific directory
- we will save the "tags attributes" set by the switch plugin to a "tags" file in the same directory as the NetCDF file one
- we will read some data of the NetCDF file from Python code with the
NetCDF4Python library
.. important::
| - if you are behind a proxy, you have to set http_proxy and https_proxy environment variables in order to be able to download any Python package you may need.
| - you may also need to disable your Linux firewall:
| systemctl status firewalld
| systemctl stop firewalld.service
| systemctl disable firewalld
3.1 Create the plugin
In order to create the plugin : run the following command:
bootstrap_plugin.py create convert_grib2
By default, a main.py Python script is created in the convert_grib2 directory. It corresponds to the main step of the plugin:
#!/usr/bin/env python3

from acquisition.step import AcquisitionStep


class Convert_grib2MainStep(AcquisitionStep):

    plugin_name = "convert_grib2"
    step_name = "main"

    def process(self, xaf):
        self.info("process for file %s" % xaf.filepath)
        return True


if __name__ == "__main__":
    x = Convert_grib2MainStep()
    x.run()
It contains a derived class Convert_grib2MainStep that inherits of the
 class:
AcquisitionStep <acquisition.step.AcquisitionStep> class.
The most important method is process which overrides the meth:process <acquisition.step.AcquisitionStep.process> method of the base class class:AcquisitionStep <acquisition.step.AcquisitionStep>.
The process method is called in the meth:run <acquisition.step.AcquisitionStep.run> method of the AcquisitionStep class.
The xaf parameter (from class:XattrFile <xattrfile.XattrFile> class) is the file to be processed.
3.2 Set dependencies
To build the plugin, we needs the eccodes programs and libraries (see https://confluence.ecmwf.int/display/ECC) provided in the MFEXT 'scientific' package.
So, the MFEXT 'scientific' package must be installed. To check this, from the /home/mfdata/ directory, just enter the grib_to_netcdf command:
grib_to_netcdf --help
For further about grib_to_netcdf, see https://confluence.ecmwf.int/pages/viewpage.action?pageId=23693254
Tell the plugin to use MFEXT 'scientific' package. Edit the .layerapi2_dependencies in the convert_grib2 directory and add the python3_scientific@mfext at the end:
python3@mfext
python3_scientific@mfext
As we will use the NetCDF4 Python library, we have to add this dependency to the 'Requirements' file (for more details on this topic, see https://pip.readthedocs.io/en/1.1/requirements.html). Edit the python3_virtualenv_sources/requirements-to-freeze.txt file and add the following line:
NetCDF4
You may mention a specific version:
NetCDF4==1.4.2
Check the dependencies settings by entering the command make develop from the convert_grib2 plugin directory.
3.3 Fill in the plugin
Let's now add Python code into the plugin to convert input GRIB file to NetCDF.
Create a grib_to_netcdf_command Python method which builds and runs the ecCodes grib_to_netcdf command:
#!/usr/bin/env python3
import re
import subprocess
....

class Convert_grib2MainStep(AcquisitionStep):
...

    def grib_to_netcdf_command(self, grib_file_path, netcdf_file_path):
        """
        Convert GRIB file to Netcdf File
        :param grib_file_path: GRIB file path to convert
        :param netcdf_file_path: output NetCDF file path to convert
        :raise: Exception if something wrong happens
        """

        # Build the 'grib_to_netcdf' command
        command_grib_to_netcdf = list()
        command_grib_to_netcdf.append("grib_to_netcdf")
        command_grib_to_netcdf.append(grib_file_path)
        command_grib_to_netcdf.extend("-k 3 -d 0 -D NC_FLOAT".split(' '))
        command_grib_to_netcdf.append("-o")
        command_grib_to_netcdf.append(netcdf_file_path)

        self.debug(command_grib_to_netcdf)

        try:
            # Run the the 'grib_to_netcdf' command
            result_grib_to_netcdf = subprocess.check_call(command_grib_to_netcdf)

            if result_grib_to_netcdf != 0:
                msg = 'Unable to execute command {}. Result is: {}.'.format(command_grib_to_netcdf,
                                                                             result_grib_to_netcdf)

                raise Exception(msg)

        except subprocess.CalledProcessError as e:
            msg = 'Unable to execute command {}. Reason: {}'.format(command_grib_to_netcdf, str(e))
            raise Exception( msg, e)
Now, we need to set the destination directory where the NetCDF files will be stored. In order to to this, we add an argument (parameter) in the section [step_main] of our config/config.ini plugin file:
[step_main]
....
# Destination directory of the converted NetCDF files
arg_netcdf-dest-dir = /tmp/my_netcdf
....
.. important::
- the parameter must always be prefixed by arg_. Then, use '-' and not '_' in your parameter: arg_netcdf-dest-dir is valid, but arg_netcdf_dest_dir is NOT valid.
- the argument parameter as Python variable will be self.args.netcdf_dest_dir.
Then, we must override the add_extra_arguments method in order to parse our netcdf_dest-dir argument:
class Convert_grib2MainStep(AcquisitionStep):

...

    def add_extra_arguments(self, parser):
        # Call the parent add_extra_arguments
        super().add_extra_arguments(parser)

        parser.add_argument('--netcdf-dest-dir', action='store',
                            default=None,
                            help='Netcdf destination directory')
...
We have to check netcdf-dest-dir argument is set and create the destination directory. We do this in the init method:
...
from mfutil import mkdir_p_or_die
...

class Convert_grib2MainStep(AcquisitionStep):
...
    def init(self):
        super().init()

        if self.args.netcdf_dest_dir is None:
            raise Exception('you have to set a netcdf-dest-dir')

        # Create dthe destination directory
        mkdir_p_or_die(self.args.dest_dir)

...
We are only interested in GRIB file.
By default, the Linux magic file doesn't contain any GRIB file identification.
So, we need to create a magic file in the root directory of the convert_grib2 plugin (for further about magic, see :doc:Identify particular types of files <../mfdata_and_magic>.
Create a new magic file in your plugin directory and add grib identification rules:
# GRIB
0   string  GRIB    GRIB file
.. caution::
The magic file must be named magic and must be stored in the plugin root directory (i.e., here, convert_grib2 directory).
Then, set the switch_logical_condition to accept only GRIB file:
switch_logical_condition = (x['latest.switch.main.convert_grib2_magic'].startswith(b'GRIB file'))
.. tip::
Because we create a custom magic file, the condition must be set on latest.switch.main.convert_grib2_magic instead of latest.switch.main.system_magic:
# CORRECT
switch_logical_condition = (x['latest.switch.main.convert_grib2_magic'].startswith(b'GRIB file'))
# BAD
switch_logical_condition = (x['latest.switch.main.system_magic'].startswith(b'GRIB file'))
Fill in the process method:
...
import os
...


   def process(self, xaf):
        """
        This function:
        - Convert a GRIB file into a NetCDF file.
        - Read some data of the NetCDF file

        :param xaf: the input GRIB data file as an XattrFile object
        :return: True, if the process is successful, False, if the process failed
        """

        # xaf.filepath is the internal file name created by the switch plugin into a temporary directory
        self.info("process for file %s" % xaf.filepath)

        try:
            # In order to get the original GRIB file name, call AcquisitionStep.get_original_basename
            original_grib_filename = str(AcquisitionStep.get_original_basename(self, xaf))

            # Build the output NetCDF file name from the input file name,
            netcdf_filename = re.sub(r'(\.grb|\.grib2|\.grib)$', '', str(original_grib_filename)) + ".nc"
            netcdf_filepath = os.path.normpath(os.path.join(self.args.netcdf_dest_dir, netcdf_filename))

            # Convert Grib to Netcdf
            self.grib_to_netcdf_command(xaf.filepath, netcdf_filepath)

        except Exception as e:
            self.exception(str(e))
            return False

        return True
Then, install (as dev build) the plugin by entering the command make develop from the convert_grib2 plugin directory.
Check the plugin is installed, by running plugins.list.
Run the plugin: inject a GRIB file :
inject_file --incoming /tmp/my_grib_file.grib2
Check the NetCDF file have been created and stored in the netcdf-dest-dir directory. You mays check the content of the NetCDF file through th ncdump commands (available in MFEXT package):
ncdump -h /tmp/my_netcdf/my_grib_file.nc
You mays also check the logs in the step_convert_grib2_main.stdout and step_convert_grib2_main.stderr in the /home/mfdata/log directory.
Did the conversion fail ? Possible reasons are due to some resource limits configured in config/config.ini file of the plugin. In order to fix these issues, you have to increase the resouce limits, especially the rlimit_as and/or rlimit_fsize parameter:
...
# resource limit for each step process
# rlimit_as => maximum area (in bytes) of address space which may be taken by the process.
# rlimit_nofile => maximum number of open file descriptors for the current process.
# rlimit_stack => maximum size (in bytes) of the call stack for the current process.
#     This only affects the stack of the main thread in a multi-threaded process.
# rlimit_fsize =>  maximum size of a file which the process may create.
# (empty value means no limit)
#
rlimit_as = 10000000000
rlimit_nofile = 1000
rlimit_stack = 10000000
rlimit_fsize = 10000000000
After editing the config.ini file, just rebuild the plugin with the make develop command.
Now, we add some code to store tags/attributes in an additional file.
Edit the convert_grib2/config.iniand add the following configuration:
# Keep tags/attributes in an additional file
arg_keep_tags = True

# If keep_tags=1, the suffix to add to the filename to store tags
arg_keep_tags_suffix = .tags
Edit the main.py Python script and add some code in add_extra_arguments and process methods so that it to look like this:
...
from xattrfile import XattrFile
...

    def add_extra_arguments(self, parser):
        # Call the parent add_extra_arguments
        super().add_extra_arguments(parser)

        parser.add_argument('--netcdf-dest-dir', action='store',
                            default=None,
                            help='Netcdf destination directory')
        parser.add_argument('--keep-tags', action='store',
                            type=bool, default=True,
                            help='keep tags/attributes into another file ?')
        parser.add_argument('--keep-tags-suffix', action='store',
                            default=".tags",
                            help='if keep-tags=True, suffix to add to the '
                                 'filename to keep tags')
...

   def process(self, xaf):
        """
        This function:
        - Convert a GRIB file into a NetCDF file.
        - Read some data of the NetCDF file

        :param xaf: the input GRIB data file as an XattrFile object
        :return: True, if the process is successful, False, if the process failed
        """

        # xaf.filepath is the internal file name created by the switch plugin into a temporary directory
        self.info("process for file %s" % xaf.filepath)

        try:
            # In order to get the original GRIB file name, call AcquisitionStep.get_original_basename
            original_grib_filename = str(AcquisitionStep.get_original_basename(self, xaf))

            # Build the output NetCDF file name from the input file name,
            netcdf_filename = re.sub(r'(\.grb|\.grib2|\.grib)$', '', str(original_grib_filename)) + ".nc"
            netcdf_filepath = os.path.normpath(os.path.join(self.args.netcdf_dest_dir, netcdf_filename))

            # Convert Grib to Netcdf
            self.grib_to_netcdf_command(xaf.filepath, netcdf_filepath)

            # We tags/attributes in a specific file
            if self.args.keep_tags:
                tags_filepath = netcdf_filepath + self.args.keep_tags_suffix
                xaf.write_tags_in_a_file(tags_filepath)

            XattrFile(netcdf_filepath).clear_tags()

        except Exception as e:
            self.exception(str(e))
            return False

        return True
Build the plugin (make develop) and inject your GRIB file again.
Check a .tags file has been created next to the NetCDF file in the netcdf-dest-dir directory. The content of the .tags file looks like:
0.switch.main.convert_grib2_magic = GRIB file
0.switch.main.enter_step = 2019-03-20T11:30:41:946203
0.switch.main.exit_step = 2019-03-20T11:30:42:006251
0.switch.main.process_status = ok
0.switch.main.system_magic = data
1.convert_grib2.main.enter_step = 2019-03-20T11:30:42:018932
first.core.original_basename = AROME_SP1_201812030600.grib2
first.core.original_dirname = incoming
first.core.original_uid = 463d0dc5826a4143a427d0b6b1e3245f
latest.core.step_counter = 1
latest.switch.main.convert_grib2_magic = GRIB file
latest.switch.main.system_magic = data
Now, we are going to learn another way to configure a plugin.
We are going to improve our plugin to be able to customize the configuration of the grib_to_netcdf command. As we saw previously, the grib_to_netcdf command has optional parameter, we hard-coded (i.e "-k 3 -d 0 -D NC_FLOAT").
We could set an arg_grib-to-netcdf-options parameter in the convert_grib2/config.ini, but here, we set this parameter in the MFDATA configuration file /home/mfdata/config/config.ini. This configuration file can contain a section per plugin. The section must be named [plugin_{plugin_name}]. Edit /home/mfdata/config/config.ini and add the following section and parameter at the ne of the file:
[plugin_convert_grib2]
grib_to_netcdf_options=-k 3 -d 0 -D NC_FLOAT
{MFMODULE}_{SECTION_NAME}_{PARAMETER_NAME}, e.g. MFDATA_PLUGIN_CONVERT_GRIB2_GRIB_TO_NETCDF_OPTIONS
.. note::
- Environment variables are always in uppercase.
- To get the new value, you have to close/reopen your terminal to force a new profile loading.
- To change daemons and services behaviour (like nginx listening port in your example), you have to restart services from a newly restarted terminal or from a root user through service metwork restart command.
For more details, see :doc:`../configure_a_metwork_package`.
Then, if you enter :
env | grep "^${MFMODULE}_" | grep CONVERT
You should see something like this:
MFDATA_PLUGIN_CONVERT_GRIB2_GRIB_TO_NETCDF_OPTIONS=-k 3 -d 0 -D NC_FLOAT
Adjust the main.py code.
Add a __init__ method in order to get the grib_to_netcdf_options from MFDATA_PLUGIN_CONVERT_GRIB2_GRIB_TO_NETCDF_OPTIONS envronment variable:
    def __init__(self):
        self.grib_to_netcdf_options_default = "-k 3 -d 0 -D NC_FLOAT"
        self.grib_to_netcdf_options = os.environ.get("MFDATA_PLUGIN_CONVERT_GRIB2_GRIB_TO_NETCDF_OPTIONS",
                                                self.grib_to_netcdf_options_default)
grib_to_netcdf_command method by replacing the hard-coded grib_to_netcdf options:
    def grib_to_netcdf_command(self, grib_file_path, netcdf_file_path):
        """
        Convert GRIB file to Netcdf File
        :param grib_file_path: GRIB file path to convert
        :param netcdf_file_path: output NetCDF file path to convert
        :raise: Exception if something wrong happens
        """

        # Build the 'grib_to_netcdf' command
        command_grib_to_netcdf = list()
        command_grib_to_netcdf.append("grib_to_netcdf")
        command_grib_to_netcdf.append(grib_file_path)
        command_grib_to_netcdf.extend(self.grib_to_netcdf_options.split(' '))
        command_grib_to_netcdf.append("-o")
        command_grib_to_netcdf.append(netcdf_file_path)

        ...
CAUTION:
You could be tempted to declare the grib_to_netcdf_options as a class attribute instead of instance attribute, e.g.:
class Convert_grib2MainStep(AcquisitionStep):
    plugin_name = "convert_grib2"
    step_name = "main"

    grib_to_netcdf_options_default = "-k 3 -d 0 -D NC_FLOAT"
    grib_to_netcdf_options = os.environ.get("MFDATA_PLUGIN_CONVERT_GRIB2_GRIB_TO_NETCDF_OPTIONS",
                                                self.grib_to_netcdf_options_default)
    def __init__(self):
        pass
...
This works, but you have to reload the context at the first time and each time the variable value is changed in the /home/mfdata/config/config.ini, by stopping en starting again MFDATA:
mfdata.stop
mfdata.start
We will now use the NetCDF4 library to read the NetCDF file.
Add the following instructions in the Convert_grib2MainStep class and the process method:
...
from netCDF4 import Dataset
...
     def process(self, xaf):
     ...
        try:
            ...

            # Read the output NetCDF
            # Log the dimensions name and variable names
            netcdf_dataset = Dataset(netcdf_filepath, "r")

            self.info("Dimensions of the Netcdf dataset {}:".format(netcdf_filepath))
            for dim_name in netcdf_dataset.dimensions:
                self.info(dim_name)

            self.info("Variables of the Netcdf dataset {}:".format(netcdf_filepath))
            for var_name in netcdf_dataset.variables:
                self.info(var_name)
Build the plugin (make develop) and inject your GRIB file again.
Check the the logs file log/step_convert_grib2_main.stdout.
3.4 Override a configuration parameter
We are going to see how to override a configuration parameter in a plugin (inheritance).
In our plugin, in case of execution failure, we would like to move the input GRIB file to a specific directory (e.g. /tmp/convert-grib2-failure). In order to do his , we will use the failure-policy and failure-policy-move-dest-dir options defined in the base class AcquisitionStep.
The default value of failure-policy is keep.
The expected value for are
- delete => we delete the file
- keep => we keep the file in trash
- move => we move the file in another directory. In this case, the failure-policy-move-dest-dir must be set.
Edit the convert_grib2/config.ini file and add in the [step_main] section:
arg_failure-policy = move
arg_failure-policy-move-dest-dir = /tmp/convert-grib2-failure
move.
To be able to raise an error in our plugin process, you may decrease the value of the rlimit_fsize option in the [step_main] section of the convert_grib2/config.ini file, e.g.:
...
# rlimit_fsize =>  maximum size of a file which the process may create.
rlimit_fsize = 100000
Build the plugin (make develop) and inject your GRIB file again.
You should see in the logs file log/step_convert_grib2_main.stderr the grib_to_netcdf command fails.
Check the input file has been moved to the /tmp/convert-grib2-failure.
Now, you may reset rlimit_fsize value to your previous value (e.g. 1000000000)
.. note::
In this tutorial, another way to trigger the failure policy is to always force a return False in the process method.
For further about overriding a configuration option, refer to :doc:../configure_a_metwork_package.
.. index:: after callback
3.5 Using the after callback
An after callback is called after the process method execution whether the method failed or not.
If you consider performing some actions after the process execution, just define (ovveride) the after method in the Convert_grib2MainStep class, e.g.:
    def after(self, status):
        """
        Method called after the process execution
        :param status: status of the process execution
        """
        self.info("GRIB to NetCDF conversion ended with status {}".format(status))
:download:Full convert_grib2 Python example </_downloads/convert_grib2/main.py>.
:download:GRIB file example </_downloads/AROME_201811280600.grib2>.
.. index:: batch plugin
4. Creating a batch plugin
This tutorial is designed to help you to create a plugin which allow to process several files from 1 to max_batch_size in one call.
Create a plugin from scratch (as explained in the Create a plugin from scratch tutorial:
bootstrap_plugin.py create batch_tuto
Go to the batch_tuto plugin directory, edit the main.py Python script and change:
- the base class
AcquisitionStepbyAcquisitionBatchStep - the
processmethod bybatch_processmethod
as below:
#!/usr/bin/env python3

from acquisition.batch_step import AcquisitionBatchStep


class Batch_tutoMainStep(AcquisitionBatchStep):
    plugin_name = "batch_tuto"
    step_name = "main"

    def batch_process(self, xafs):
        results = []
        for xaf in xafs:
            file_name = self.get_original_basename(xaf)
            self.info("batch process for file {} (original name is: {}".format(xaf.filepath, file_name))
            results.append(True)

        return results


if __name__ == "__main__":
    x = Batch_tutoMainStep()
    x.run()
So, the Batch_tutoMainStep class inherits of the class:AcquisitionBatchStep <acquisition.batch_step.AcquisitionBatchStep> class.
The most important method is batch_process which overrides the meth:batch_process <acquisition.batch_step.AcquisitionBatchStep.batch_process> method of the base class class:AcquisitionBatchStep <acquisition.batch_step.AcquisitionBatchStep>.
The batch_process method is called in the meth:run <acquisition.step.AcquisitionStep.run> method of the class:AcquisitionStep <acquisition.step.AcquisitionStep> class.
The xafs parameter is an array containing the files to be processed, each item is an class:XattrFile <xattrfile.XattrFile> instance.
If the batch_process method returns:
True: the processing is considered to be successful for each processed fileFalse: the processing is considered to be failed for each processed file- an array of
booleanwith the same than thexafsarray: the processing status is considered for each file.
The main arguments of a batch plugin are:
- batch-process-max-size: the maximum number of files before launching
batch_process. Default value is 100 (files). - batch-process-max-wait: the maximum waiting time, in seconds, before launching
batch_process(when the batch_process_max_size is not reached). Default value is 10 (seconds).
So, the batch_process method is called when, at least, one of the two conditions is true:
- the maximum of files to process is reached
- the mximum of time to wait is reached
If the default values don't suit you, you may override the batch_process_max_size and batch_process_max_wait properties in the main.py Python script:
...

class Batch_tutoMainStep(AcquisitionBatchStep):
...

   @property
    def batch_process_max_size(self):
        """Return the max size of a batch in batch process mode.
        """
        return 5

    @property
    def batch_process_max_wait(self):
        """Max wait (in seconds) to fill the batch in batch process mode.
        """
        return 60

...
You may use an more dynamic way to override the batch_process_max_size and batch_process_max_wait properties:
-
edit the
[step_main]section of thebacth_tuto/config.inifile and add:# batch-process-max-size : maximum number of files before launching batch process. # Default is : '100' arg_batch-process-max-size = 5 # batch-process-max-wait : maximum time before launching batch process (in seconds) # Default is : '10' (seconds) arg_batch-process-max-wait = 60 -
In the
main.pyPython script:- ovverride the meth:
add_extra_arguments <acquisition.step.AcquisitionStep.add_extra_arguments> - change the
batch_process_max_sizeandbatch_process_max_waitproperties - log the
batch_process_max_sizeandbatch_process_max_waitproperties
- ovverride the
from acquisition.batch_step import AcquisitionBatchStep


class Batch_tutoMainStep(AcquisitionBatchStep):
    plugin_name = "batch_tuto"
    step_name = "main"

    def add_extra_arguments(self, parser):
        parser.add_argument('--batch-process-max-size', action='store', default='100',
                            help='Max number of files before launching batch process')

        parser.add_argument('--batch-process-max-wait', action='store', default='10',
                            help='Max time before launching batch process')

    @property
    def batch_process_max_size(self):
        """Return the max size of a batch in batch process mode.
        """
        return int(self.args.batch_process_max_size)

    @property
    def batch_process_max_wait(self):
        """Max wait (in seconds) to fill the batch in batch process mode.
        """
        return int(self.args.batch_process_max_wait)

    def batch_process(self, xafs):
        self.info("batch process batch_process_max_size: {}".format(self.batch_process_max_size))
        self.info("batch process batch_process_max_wait: {}".format(self.batch_process_max_wait))
        self.info("batch process xafs size: {}".format(len(xafs)))

        results = []
        for xaf in xafs:
            file_name = self.get_original_basename(xaf)
            self.info("batch process for file {} (original name is: {}".format(xaf.filepath, file_name))
            results.append(True)

        return results


if __name__ == "__main__":
    x = Batch_tutoMainStep()
    x.run()
In this tutorial, we will accept all incoming files by setting the switch_logical_condition to True in the [step_main] section of the bacth_tuto/config.ini file:
switch_logical_condition = True
Then, install (as dev build) the plugin by entering the command make develop from the bacth_tuto plugin directory.
Check the plugin is installed, by running plugins.list.
Run the plugin: inject a file :
inject_file --incoming {my_file}
Then, you should see in the logs ~/log/step_batch_tuto_main.stdout the file is processed after the batch-process-max-wait is reached.
Then, run again the plugin by injecting more than the batch-process-max-sizenumber of files.
Let's assume, arg_batch-process-max-size = 5 and arg_batch-process-max-wait = 60. Inject 7 files in the incomin MFDATA directory (repeat command inject_file --incoming {my_file} 7 times or use cp {files} /home/mfdata/var/in/incoming/ ).
Then, check the logs ~/log/step_batch_tuto_main.stdout. You will see the batch_process is launched after the 5th file is injected. Then, wait 60 seconds, check the logs again and you will see the last two files are processed 60 seconds later.
You could also build and check the Sending a file by FTP tutorial which implements a class:AcquisitionBatchStep <acquisition.batch_step.AcquisitionBatchStep> base class (see send.py Python script).
.. index:: monitoring, MFADMIN, dashboard
5. Implement custom monitoring and metrics in a plugin
In this tutorial, we will learn how to implement some metrics in a plugin and how to show them in a monitoring dashboard.
What we want to measure is the elapsed time to convert a GRIB file to a NetCDF file in the 'grib_to_netcdf_command' function of the Create a plugin from scratch tutorial.
5.1 Add metrics in the Python code of the plugin
In order to do this, we will use the meth:get_stats_client <acquisition.step.AcquisitionStep.get_stats_client> method of the base class class:AcquisitionStep <acquisition.step.AcquisitionStep>.
The get_stats_client method returns a class:AcquisitionStatsDClient <acquisition.stats.AcquisitionStatsDClient> instance.
In order to create metrics, we just have to call the timer
meth:timer <acquisition.step.AcquisitionStep.timer> method from AcquisitionStatsDClient instance. It returns an
timer instance. For further details, you may check StatsD documentation and its Api Reference.
Let's add our metrics to the grib_to_netcdf_command function. Edit the main.py file and add the instructions as below:
    def grib_to_netcdf_command(self, grib_file_path, netcdf_file_path):
        """
        Convert GRIB file to Netcdf File
        :param grib_file_path: GRIB file path to convert
        :param netcdf_file_path: output NetCDF file path to convert
        :raise: Exception if something wrong happens
        """

        # ADD THESE LINES
        #------------------
        # Create timer called 'grib_to_netcdf_metrics'
        timer = self.get_stats_client().timer("grib_to_netcdf_metrics")
        #  timer object to start counting
        timer.start()
        #------------------

        # Build the 'grib_to_netcdf' command
        command_grib_to_netcdf = list()
        command_grib_to_netcdf.append("grib_to_netcdf")
        command_grib_to_netcdf.append(grib_file_path)
        command_grib_to_netcdf.extend(self.grib_to_netcdf_options.split(' '))
        command_grib_to_netcdf.append("-o")
        command_grib_to_netcdf.append(netcdf_file_path)

        self.debug(command_grib_to_netcdf)

        try:

            # Run the the 'grib_to_netcdf' command
            result_grib_to_netcdf = subprocess.check_call(command_grib_to_netcdf)
            if result_grib_to_netcdf != 0:
                msg = 'Unable to execute command {}. Result is: {}.'.format(command_grib_to_netcdf,
                                                                            result_grib_to_netcdf)
                raise Exception(msg)

            # ADD THESE LINES
            #------------------
            # Increment a counter 'bytes_of_output_netcdf_files' with the size of the output Netcdf (in bytes)
            self.get_stats_client().incr("bytes_of_output_netcdf_files", os.path.getsize(netcdf_file_path))
            #------------------

        except subprocess.CalledProcessError as e:
            msg = 'Unable to execute command {}. Reason: {}'.format(command_grib_to_netcdf, str(e))
            raise Exception(msg, e)

        # ADD THESE LINES
        #------------------
        finally:
            # stop timing and send the results
            timer.stop()
Then, build the plugin by entering the command make develop from the convert_grib2 plugin directory.
5.2 Create a specific dashboard with our metrics
Now, we have to 'connect' MFDATA to MFADMIN for monitoring and open MFADMIN Grafana GUI Interface from a browser. In order to do this, refer to :ref:mfdata_tuning_monitoring:Monitoring and Dashboards.
Now, we will create a specific dashboard with the following metrics:
- The
grib_to_netcdf_metricsmetrics will measure the duration of the GRIB to Netcdf conversion. - The
bytes_of_output_netcdf_filesmetrics will measure the size of the NetCDF output file. - The
bytes_of_processed_filesmetrics, created in the base classclass:AcquisitionStep <acquisition.step.AcquisitionStep>, will measure the size of the input file.
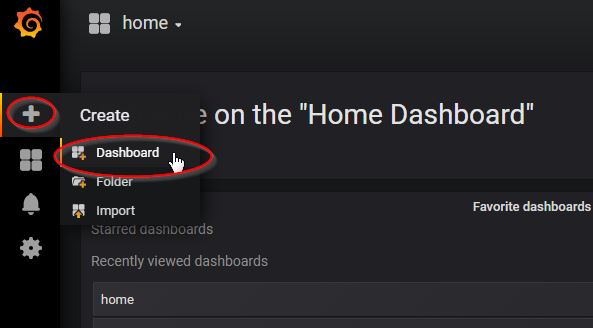
From the Grafana Interface, create a new dashboard (click + then dashboard):
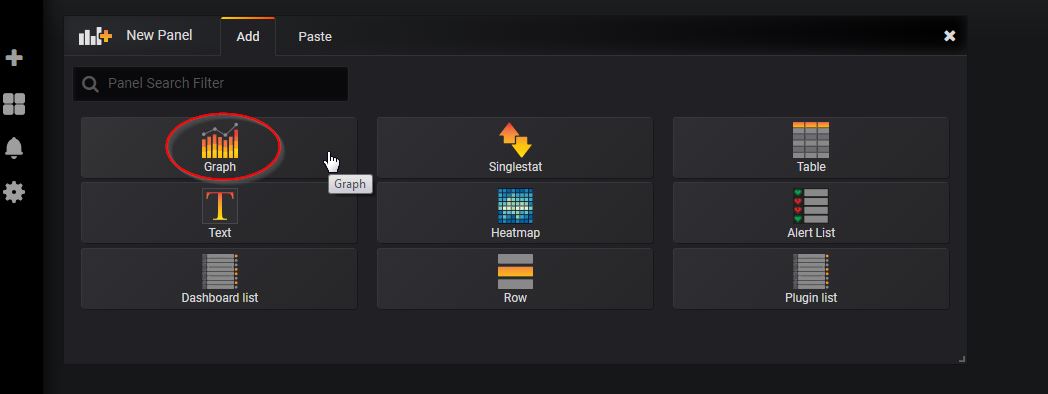
Then, select Graph:
We are going to create a graph that display the mean duration of the GRIB to NetCDF conversion, i.e. the grib_to_netcdf_metrics, we created in the Python code above.
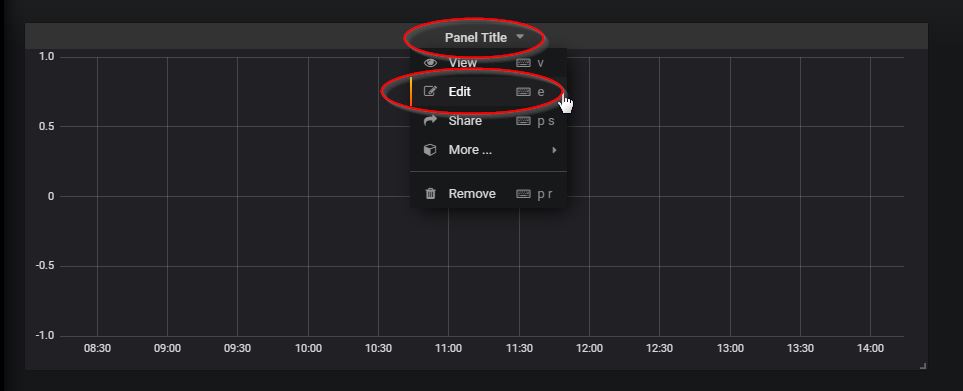
Edit the dashboard, from Panel title, select Edit:
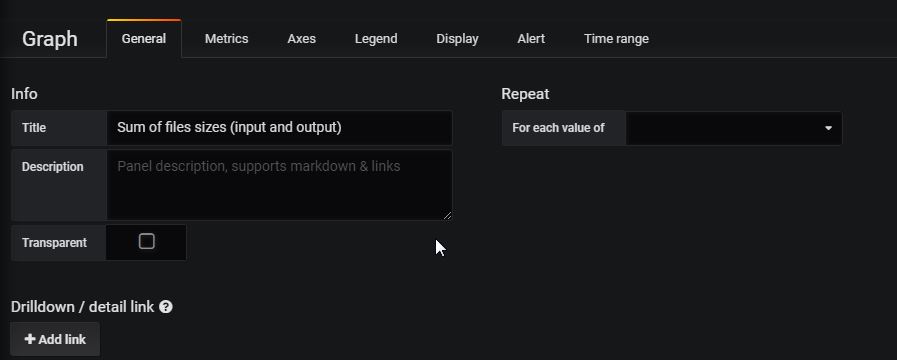
Enter the title from the General Tab:

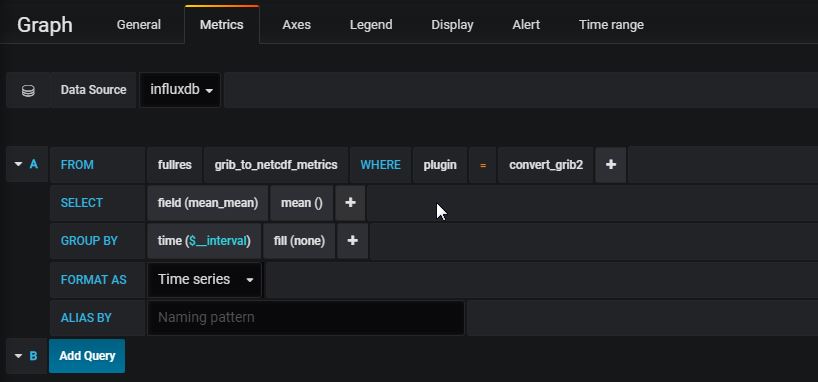
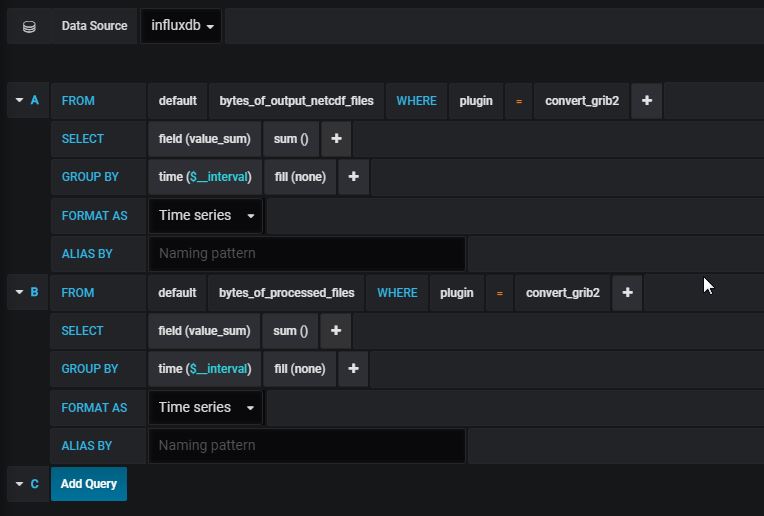
Enter query data from the Metrics Tab, as below:
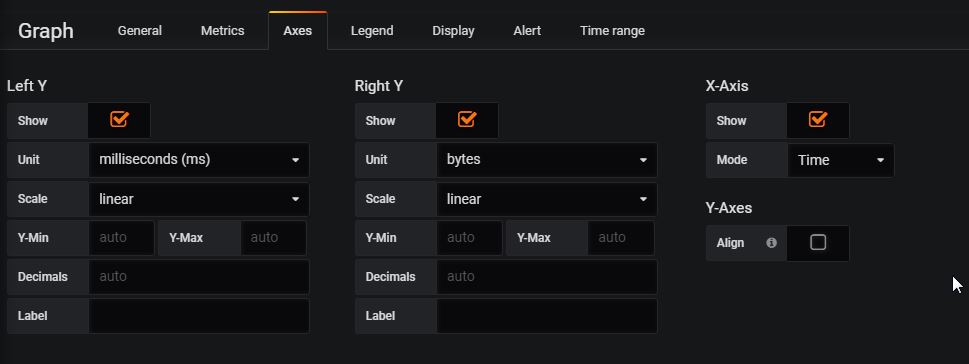
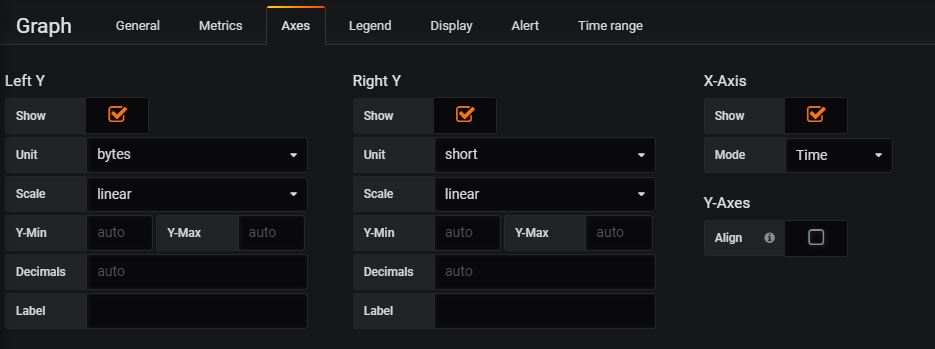
Enter axes data from the Axes Tab, as below:
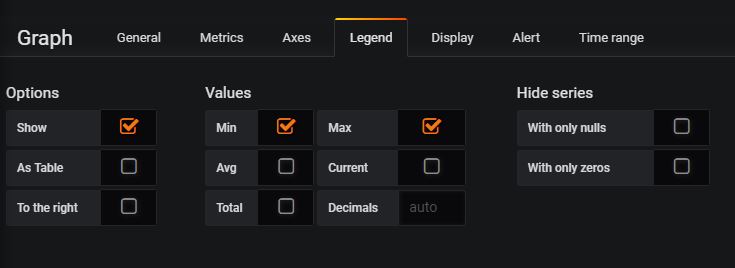
Then, Legend Tab:
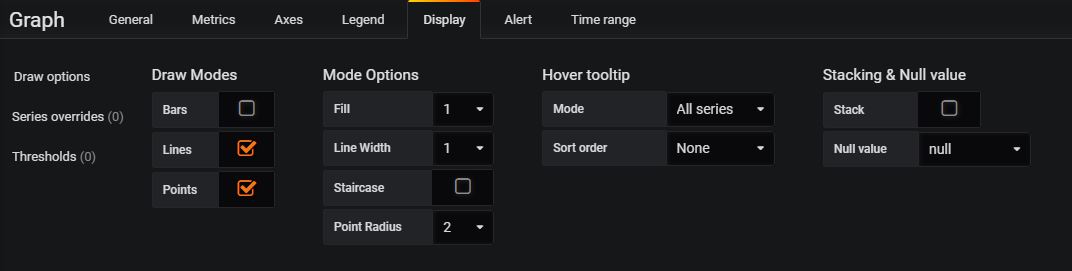
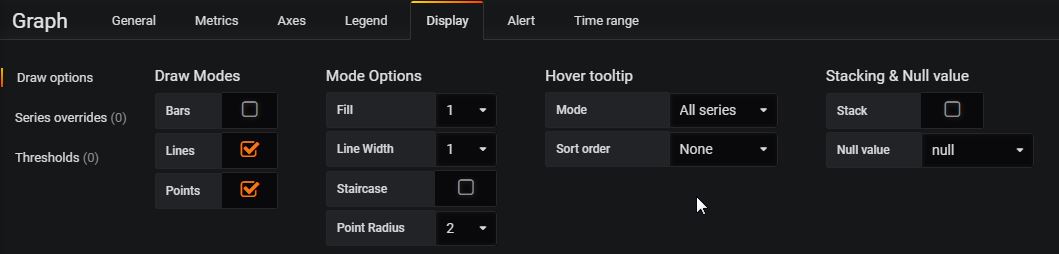
Display Tab:
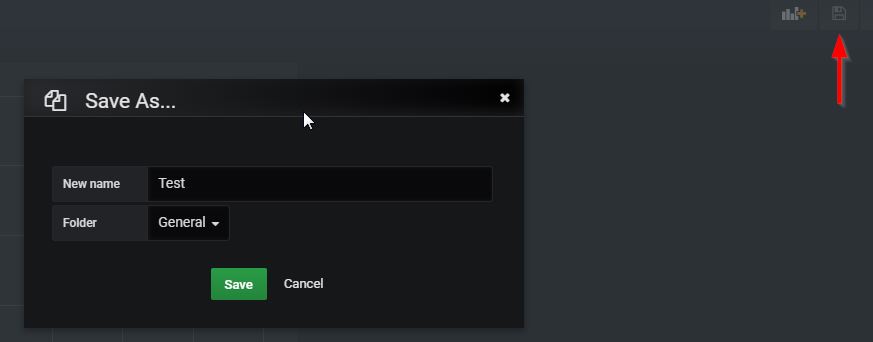
Then save the dashboard:
Then add a new graph in our dashboard that display the sum of the input and output files sizes, i.e. the bytes_of_output_netcdf_files and bytes_of_processed_files metrics:
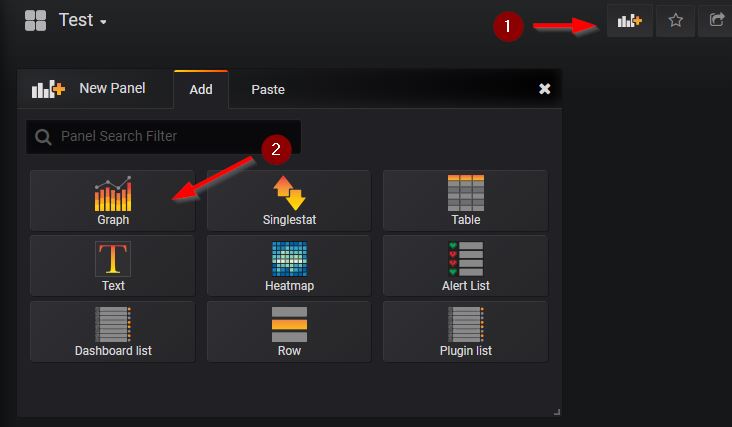
Enter data as below:
Save the dashboard.
5.3 View metrics on the dashboard
Then, run the convert_grib2 plugin by injecting some GRIB files.
You may download this :download:GRIB file example </_downloads/AROME_201811280600.grib2>. You may also download more GRIB files from this site.
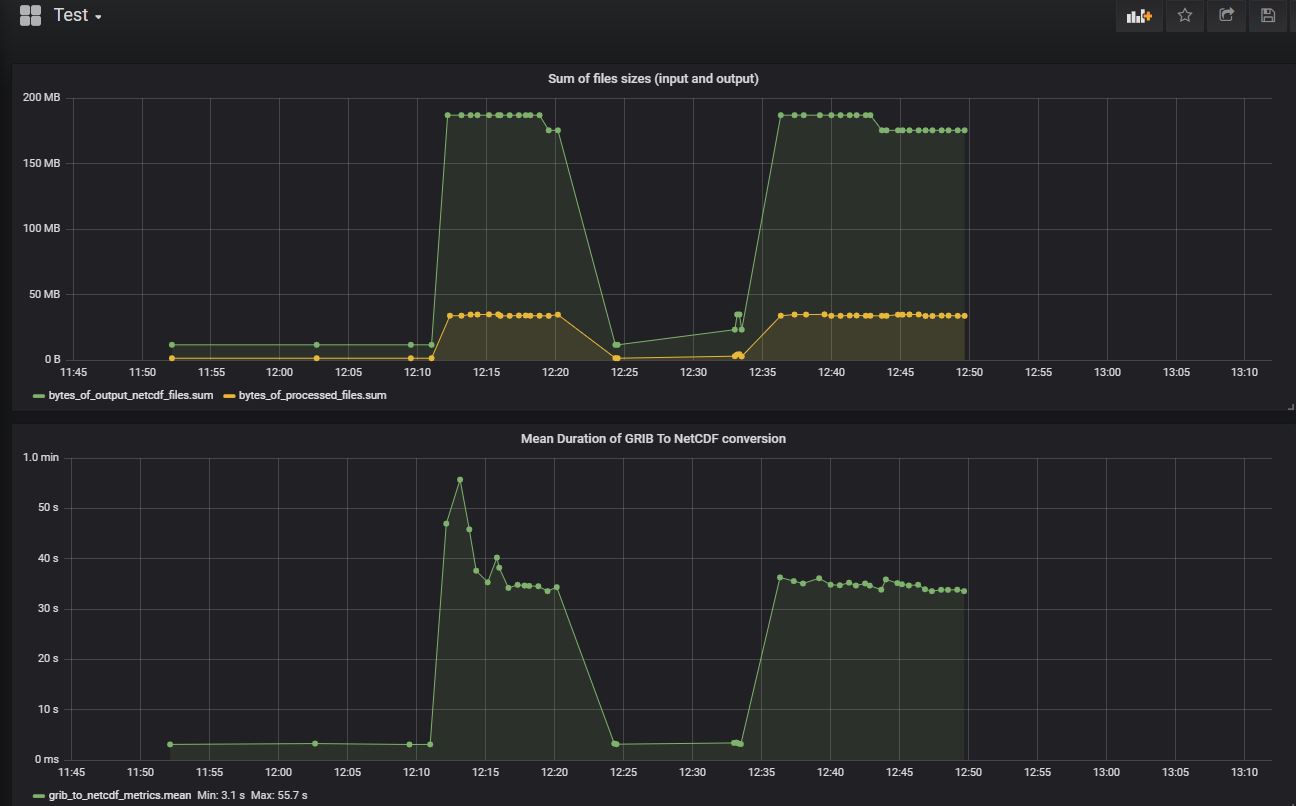
Then, from the MFADMIN Grafana GUI Interface, open your dashboard and you should see some the metrics displayed on the graphs.
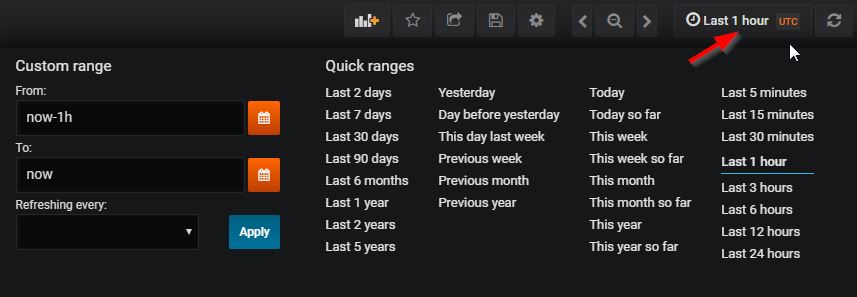
You may also change the time ranges, by selecting a prédefined range or entering your custom range:
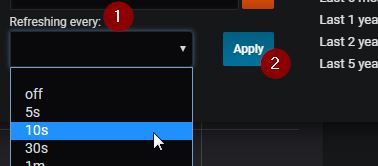
You may automatically refresh the graph:
5.4 Useful links and Tips
Check :ref:mfdata_tuning_monitoring:Useful links and Tips from the :doc:../mfdata_tuning_monitoring documentation.